Table of Contents
Remote Observing
10/30/2020
Currently our remote observing still requires a user at the telescope. However, we are working on developing monitoring tools and making it easier to reach the remote observing goal.
Using An SSH Tunnel
The simplest way of accessing the telescope and observing websites is to use an SSH tunnel. All you need to do this is knowledge of the rts2obs password and/or your own ssh key. First, add some hosts to your ~/.ssh/config file. My private ssh key on my MacBook Air is stored in “/Users/pnd/.ssh/rts2obs” so edit that to suit your own key:
# +
# rts2obs
# -
Host rts2obs
  Hostname kuiper.as.arizona.edu
  User rts2obs
  IdentityFile /Users/pnd/.ssh/rts2obs
# +
# rts2artn
# -
Host rts2artn
  Hostname 10.30.1.24
  User rts2obs
  ForwardAgent yes
  ProxyCommand ssh -X -Y rts2obs nc %h %p 2> /dev/null
  IdentityFile /Users/pnd/.ssh/rts2obs
# +
# rts2pi
# -
Host rts2pi
  Hostname 10.30.1.25
  User pi
  ForwardAgent yes
  ProxyCommand ssh -X -Y rts2obs nc %h %p 2> /dev/null
  IdentityFile /Users/pnd/.ssh/rts2obs
To check that this has worked, you should now be able to login to both those machines using the shorthand hostnames. Note that this might prompt for a password until you install your public key in the authorized_keys file on the remote machine:
% ssh -XY rts2obs
rts2obs@gerard:~$ exit
% ssh -XY rts2pi
pi@raspberrypi:~ $ exit
Add the following commands to a ~/.alias file:
alias rts2pi_tunnel="ssh -CL 5000:localhost:5000 rts2pi"
alias rts2artn_tunnel="ssh -CL 8080:localhost:80 rts2artn"
alias xrts2pi_tunnel="xterm -e ssh -CL 5000:localhost:5000 rts2pi &"
alias xrts2artn_tunnel="xterm -e ssh -CL 8080:localhost:80 rts2artn &"
When ready to remote eavesdrop, source the file:
% source ~/.alias
Now, either run the simple tunnel in a regular terminal or use the terminal start:
% xrts2pi_tunnel
% xrts2artn_tunnel
NB: you *must* wait until the tunnel is complete and you are logged into the remote machine.
Then–voila!–point your local browser to:
http://localhost/5000
http://localhost/8080/dashboard
http://localhost/8080/js9
http://localhost/8080/
Smart VPN
Compatible with Draytek Router.
Available for MacOS, Windows, and mobile.
Download Here
Setup VPN
Create a new profile.
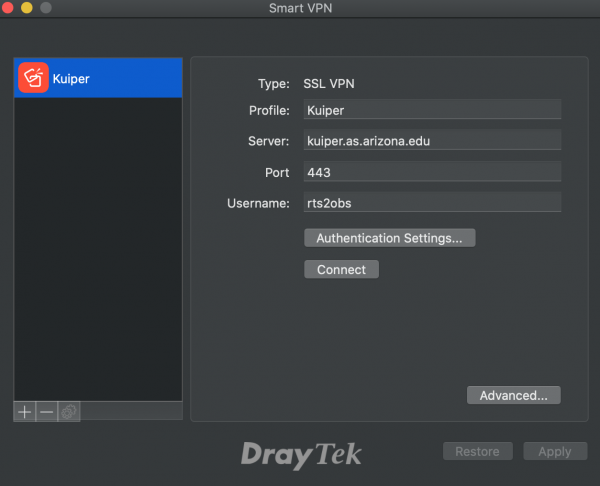
  Type: SSL VPN
  Profile: Kuiper
  Server: kuiper.as.arizona.edu
  Port: 443
  Username: ARTN RTS2 Observing Account Username
Select Authentication Settings to enter the password.
Password: ARTN RTS2 Observing Account Password
Select Advanced
Select More Routes
Add a new route
10.30.0.0/16
Exit Advanced and then click Connect
You are now on the Kuiper network. You will be able to open up a terminal on your computer and ping bigartn 10.30.1.24. Websites only available on the network are viewable on your own web browser. There is no need of SOCKS tunneling or opening up Firefox as an X window.
Windows Fix
A user ran into the issue of installing Smart VPN with windows. They followed this page to correct the issue.
Remote Dome Open Only
To open:
- echo BIG61 UPPERDOME 123 COMMAND DOMESLIT OPEN FORCE | nc bigudome 5750
It can take a few seconds to start so give it a minute.
To close:
- echo BIG61 UPPERDOME 123 COMMAND DOMESLIT CLOSE FORCE | nc bigudome 5750
Useful Links
These links are only valid when on the network logging into the VPN described above.
Our web presence is currently being updated and this will change soon.
