This is an old revision of the document!
Table of Contents
What's New at VATT
PHD2 Settings as of October 2022
Activating PHD2 by clicking the icon on vattcontrol desktop now brings you to a PHD2 profile which is correctly connected to the INDI driver. What remains to be done is to connect the INDI driver to the camera itself just by clicking on the main tool bar icon that looks like a USB male connector: connect equipment window appears, and there just click the Connect buttons for the camera and the telescope mount.
The chip cooling does not work.
Set the binning to 8×8.
After that, use the brain icon to open Advanced Setup. Go to the Guiding tab, and check the following:
search region 20
HFD should be 1.5
calibration step should be 1000
For VATTspec also go to the Algorithms tab, and check:
Scope MxRA and MxDEC
The correct IP setup is loaded by default. Just for reference, it is:
subnet 10.0.255.255
IP:port 10.0.3.14:2571
Temperature Data in TCS as of December 2022
The Air Temp, Strut Temp, Mirror Temp, and Mirror Air Temp (the Thermal tab in TCSglue) must be regarded as unreliable.
![]()
![]()
![]() Thermal shock is a
Thermal shock is a ![]() danger
danger  to glass integrity
 ![]()
![]() NEVER open the mirror cover if the mirror is more than 5°C warmer than ambient air
NEVER open the mirror cover if the mirror is more than 5°C warmer than ambient air ![]()
![]()
![]()
What does this mean in practice:
![]() First, run the thermal control system (NESLAB [in the silo] + cell fans [GUI] + TCSglue [GUI]) to bring the M1 temperature down at the beginning of the night, using the
First, run the thermal control system (NESLAB [in the silo] + cell fans [GUI] + TCSglue [GUI]) to bring the M1 temperature down at the beginning of the night, using the Set point mode. Then, during the night, leave the system running in the On mode.
Example. Sunset is at 17:30. At 16:30 TCSglue sees the Air Temp as 0°C, and the Mirror Temp as 1°C. The actual ambient temperature at 18:00 will be around -4°C. At 16:30 open the dome slit, and start the large dome fan to evacuate the accumulated warm air. Turn on NESLAB (in the silo) and the cell fans (control room with TCSglue). Activate the thermal control code, using a set point of -4°C. After about an hour, mirror temperature ought to be approaching the set point, bringing the temperature difference with respect to ambient within the safety limit (ΔT<5°C). For the remainder of the night, turn off the thermal control system (TCSglue [GUI], Thermal tab, Off radio button; turn off NESLAB (in the silo) and the cell fans using TCSglue).
Note that about 5-10 minutes after you turn off the thermal control system, there will be a significant jump in the Air Temp and Strut Temp values and a slightly smaller jump in the Mirror Temp and Mirror Air Temp. A few cycles later the values will stabilize and become realistic.
Watchman wifi thermometers
You may use a new Watchman wifi device for independent measurements of temperature and humidity in the dome. It is plugged in (it needs 5V power) by the flood lamp and the dome cameras (legacy and HikVision). This is “dirty” power, which means that the device is available during lightning shutdowns.
Open the link http://10.0.3.20:42778/d9e3ce041522&Stats in any browser.
Another unit (temperature, humidity, pressure) is in the enclosed opening at the base of the pier; go to http://10.0.3.21/52c4b2062022&Stats
And a third unit (temperature, humidity; no display) is in the basement pump room by the grill on the SW porch; go to http://10.0.3.22/d729ba062022&Stats
An hourly log is available in the cloud. Go to https://pp-code.azurewebsites.net/, logging in as pgabor@arizona.edu with the usual VATT observer password. You will find a button marked Click here for your Watchman logs prominently displayed. Click on it. This will take you to a list of devices. Click on the device name (VATT_dome) to see its logs.
Electric blankets
On June 8, 2022, PG requested that henceforth the custodial crew make beds without installing the electric blankets. Feel free to use one if you wish (they are readily available in the closets). The “total stripping” policy (see below, section Departure Procedures to Facilitate Cleaning as of 2020-10-20) is still in place, i.e., if you use an electric blanket, place it in the blue bag with all the other beddings. It will need to be washed.
Samsung Galaxy Tablet for Skype and Zoom as of June 2022
The Skype app no longer appears to function on the Samsung Galaxy Tablet (log in impossible). ![]() Please use your cell phone for
Please use your cell phone for Skype. Use the account vatt.telescope with the usual VATT observer password.
The tablet still works well with the Zoom app. Zoom does not require you to log in. When you open the Zoom app, simply join a meeting (by typing in meeting's 10 or 11-digit numerical identifier) and set your participant name according to your pleasure.
![]() For your reference, the recurring
For your reference, the recurring Zoom meeting with the LBT's TO (telescope operator), support astronomer, and users is 886 440 6140.
Handheld two-way radio units
We replaced the Kenwood handheld two-way radio units which suffered from compromised battery life, with three new two-way hand-held radio units (Baofeng UV5R with 3800mAh batteries): two have their charging stations in the VATT box at base camp, and one has its charging station at the VATT, by the color printer.
The Kenwood unit listened to one channel and broadcast on one channel (MGIO RPT) when you pressed its PTT (push-to-talk) button. The Baofeng unit listens to two channels simultaneously (MGIO RPT and MGIO LOC), and it can broadcast on one of these two channels. When you power the unit up, the PTT button lets you broadcast on the MGIO RPT channel. Should you wish to broadcast on the MGIO LOC channel, unlock the keypad (# button at bottom right) and switch to channel B (2nd line on the display) using the blue A/B button above the keypad. Then the PTT button will let you broadcast on the MGIO LOC channel.
When the unit is on, repeated pressing of the MONI button (just below the PTT button) operates the flashlight (on, flash, off).
Oil Chillers as of February 2022
Chiller 1 is out of order. Use chiller 2.
Startup:
- By the north wall of the basement pump room:
- Turn on the building and pier fans
- At the cabinet at your left when exiting the elevator:
- Turn on
Step 1(pulling out mushroom button)
- At the oil tank by the south wall of the basement pump room:
- Make sure both chiller 1 and 2 controls are in
Manualmode - Turn on Chiller 2 (push button)
- Back at the cabinet at your left when exiting the elevator:
- Turn on
Step 2
Shutdown:
- At the cabinet at your left when exiting the elevator:
- Turn off
Step 2
- At the oil tank by the south wall of the basement pump room:
- Turn off Chiller 2 (push button)
- Back at the cabinet at your left when exiting the elevator:
- Turn off
Step 1(pushing in mushroom button)
- By the north wall of the basement pump room:
- Turn off the building and pier fans
Guidebox after Lightning Shutdown as of 2021-06-16 (minor revisions 2021-07-08, 2022-02-13)
Good news: Many guide box incidents were likely caused by a deficient connector. The issue was addressed and the system is much more stable. If you still have the misfortune of running into illogical guide box issues, especially immediately after an instrument change, consider the connectors (Gary Gray and Michael Franz can provide advice).
Coming out of lightning shutdown the guide box is likely to run into communication problems. The remedy is to run the INDImon script (its launcher on VATTcontrol's desktop is labeled Restart indidriver), selecting option (3) Filter/Guidebox driver (to the following query, type “Y” followed by Enter).
Use Reference if all the Guidebox GUI fields remain yellow after startup. More information can be found in the vatt_warm_startup_checklist.
This is great news because previously the remedy was thought to entail cycling power on two power supplies located in the the pier cubbyhole. The productiveness of this physical exercise was often questionable. The new solution is not only much more comfortable but it also possesses the wonderful virtue of effectiveness!
M1 Cell Fans as of 2021-05-19
The M1 Cell Fans back! ![]() Start/stop them through TCSglue again, as in the days of yore. Thanks to David Forbes, Chris Johnson and Gary Gray.
Start/stop them through TCSglue again, as in the days of yore. Thanks to David Forbes, Chris Johnson and Gary Gray.
Dome Slit as of 2021-04-29
David Forbes returned the dome slit control unit to full functionality. The dome slit can be operated remotely via the TCSglue GUI as well as manually from the dome.
Departure Procedures to Facilitate Cleaning as of 2020-10-20
You are kindly requested to strip everything from the bed, including sheets, mattress pad covers or toppers, thin pillow cases, zipper pillow protectors, thick pillow cases matching the quilts/coverlets, the quilts/coverlets themselves, blankets, and the electric blankets. In other words, everything with the exception of the mattress itself, and the pillows themselves. Then put it all in the blue bag (you will find it in your room), and set it outside the door.
If there is an accident resulting in a particular biohazard (e.g., a nose bleed), put the contaminated items in a separate bag and attach a warning label.
New Mountain Operations VATT Homepage (as of 2020-10-01)
Check out the new Mountain Operations homepage for the VATT: http://vatt.as.arizona.edu/ It is the same format as the MtnOps homepages for the other telescopes in their care (eg http://kuiper.as.arizona.edu/). It is still a work in progress and suggestions are welcome.
Secondary & Guide-Box GUI as of 2020-10-01
It runs in a browser window. The browser is Mozilla Firefox. It is strongly recommended that you refrain from using Mozilla Firefox on vattcontrol for other purposes.
If the GUI freezes, just refresh the browser window (CTRL-R).
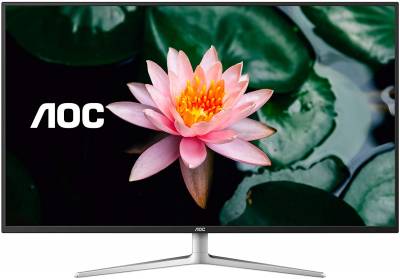
AOC 4k Monitors as of 2020-10-01
These monitors are nice.

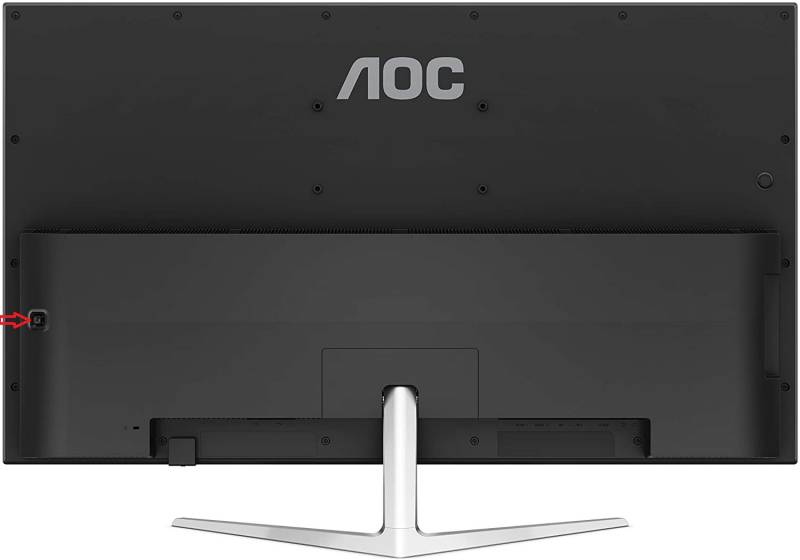
But it is not obvious where the controls are.

Note the red arrow (left edge of the picture). It points to a multipurpose button. If you hold it down for a couple of seconds, it toggles the monitor on/off. If you touch it briefly, it brings up the monitor menu, and then moving the button up-down-left-right joystick style, allows you to navigate the menu.
The AOC 4k monitors are U4308V. Here is the manual.
AOC 4k Monitors and the HP ThinClient Xterminals as of 2020-10-08
The new monitors support a 60Hz refresh rate. We strongly suspect that the HP ThinClients' graphics card sometimes overheats (making the ThinClient unresponsive) when handling the 4k monitor at 60Hz. Make sure the refresh rate is set to 30Hz in the HP ThinClient Xterminal's Display Settings.
INDI Server as of 2020-10-01
The INDI server must be running in order to communicate with vatttel, i.e., it must be running before you start azcam, xephem, PHD2, etc. Activate the INDI server by clicking the eponymous desktop icon.
Dome Tracking as of 2020-10-01
Once in a while the dome may stop tracking. There will be no warning other than loss of starlight.
Remedy:
In TCSglue (main window) click on Dome Tracking twice: First to turn it off, and then to turn it back on again.
VATT Sacrificial PC as of 2020-10-01

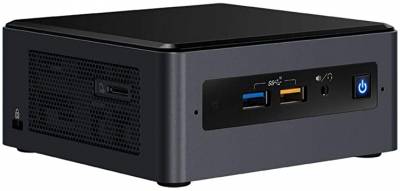
It is an Intel NUC, located on top of the server rack in the instrument room. We call it the sacrificial PC because it is not turned off nor disconnected during a lightning shutdown.
You can access it through the HP Thin Client xterms using the Windows remote-desktop protocol (the linux software accessing this on the xterms and on our linux servers is FreeRDP). The desktop icon is marked vattsacpc.
This is a great resource for accessing the new HikVision dome camera (10.0.2.30), the new HikVision FinderScope camera (10.0.2.29), and the new Axis thermal IR P12 camera (10.0.2.28).
NB. The remote desktop is a fixed-size window; it does not resize.
IRAF as of 2020-10-01
IRAF is installed on vattcontrol and vattiraf.
vattcontrol
- open
Data Server(desktop icon): this will open a terminal and ads9session - open
IRAF(desktop icon): this will open a terminal with thecl>prompt
What will this do? When azcam acquires an image, it appears in ds9. Unfortunately, you cannot run imexam on this image straight away. You need to display it in one way or another again from the cl> terminal.
vattiraf
Here, you may run iraf plain and simple. Not integrated with azcam.
PHD2 as of 2020-10-01
There will be some warnings which you should ignore:
- one warning will concern the Darks & Bad-Pixel Maps
- one warning will concern the calibration (number of steps)

