This is an old revision of the document!
Table of Contents
Schulman Telescope Startup Procedure
Updated 8/4/2022 - Travis Deyoe
The order of operations below is designed for time efficiency. Missing a step could lead to frustration as some steps may feel “out of order” but are designed to reduce down time waiting for things to power on.
Pre-Startup Checks
Pull Off Tarps
The Telescope, Controller, and desk will always be tarped whenever the telescope is put into Lightning Shutdown. They will need to be removed before inspecting or moving the telescope.
Perform your best interpretive dance to appease the tarp gods. If that does not make the tarp fall off you must remove it manually. Folding it up and placing it to the right of the brown cabinet is a nice touch.
Check Telescope Position
Verify the the telescope is not at any limits. If it is or looks “wrong” to you move it manual into a safe position before the next steps. This guarantees that it will be able to successful and safely home in a future step. It's recommended to place it either at Zenith or the Park position.
Check Emergency Stops
If engaged, release any E-stops on the Hand Paddle, Telescope Controller, and the MaxDome Controller. They all appears as big red buttons that scream “PRESS ME IN CASE OF EMERGENCY”.


Check the telescope Balance state
The telescope is in a balanced state when one of the following conditions are met:
- The camera is on with a single weight attached at the “top” of the backplate.
- The focuser is on with both eyepiece weights attached on either side of the focuser and there is no weight on the “top” of the telescope.
In either state an eyepiece should be in the 6“ refractor and the mirror covers are open (this will be done later in the this step. If neither of these are the state the telescope is in place it in one of the Configurations now or at the very least before homing the telescope.
Check RA Encoder Tape
Follow the RA optical tape along the big RA wheel and check for any smudges, bug guts, and so forth. The WEST read head is active while the east read head is not currently utilized so make sure through the entire motion of the telescope (in RA of course) that there is nothing blocking the reading of the tape on the west side and that there is nothing obstructing the read heads ability to “see” the optical tape.
Make certain both the drive and idler bearings are also free of anything that might be transferred to the optical tape. There is a bit of felt held in place there that should wipe off anything but its best to check still.
If anything is observed use a microfiber cloth or TEX wipe to wipe it away. 99% isopropyl alcohol may be utilized if necessary. Note that you should only wipe along the narrow length NOT along the circumference of the tape.
Powering everything on
Now that you have inspected the telescope for safety it is now time to start turning things on.
Power On UPS's
First plug in the Big and Small UPS's to the left of the desk. The BIG UPS should be twisted clockwise after insertion in order to secure it in the socket. The Big UPS powers the larger controller box on the wall above it while the Small UPS powers basically everything else.


Next you must turn on both UPS's. Press and hold the corresponding “on” button for at least a second until you hear a beep then let go. For the Big UPS this will take a few moments as it cycles through some littles (shown in full in the GIF below). The Small UPS will power on quicker.
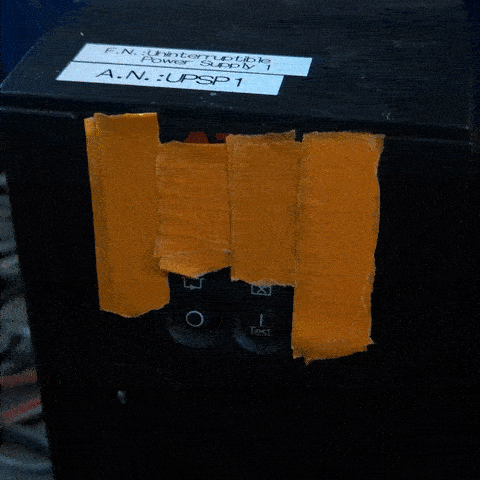

Both UPSs will immediately supply power to their output plugs so no further button pressing is necessary.
Power On Controller and Desktop computer
The big gray box on the wall is the Controller. Turn it on by turning the large red switch on the bottom left of the Controller box to the right (clockwise). Assuming the UPS was powered on in the last step Fans and other noises will be heard as the system comes on.

Now is also when you should turn on the Desktop computer. It is under the desk behind the little door on the left. The power button is the same color as the computer case so in a dimly lit room (like it most likely is now without the dome open) you may need a light to find it.
Power on TIM Unit
The TIM unit is a small gray/black box on back of the telescope just below where the camera or eyepiece is installed. There is a standard power switch on the left side to turn it on.
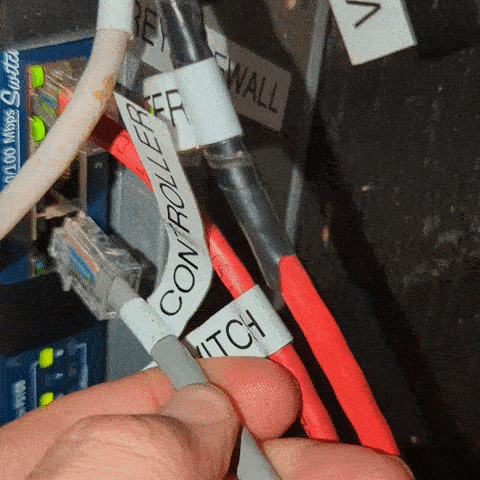
Check Controller Ethernet Cable
While the Controller and Desktop are powering on (the Controller takes about 15 years to do so) go into the warm room. Now go into the closet. There is a grey ethernet cable labelled “Controller”. Plug this into the switch on the right wall and confirm there are the happy internet lights on the switch.
Desktop Tasks
Procced back to the desktop computer which should be fully powered on. Login to the computer (standard SkyCenter password). The next few task will all be done on this computer.
Open Mirror Covers
Open the RCOS TIM software from the desktop link or toolbar quick link.

Connect to the TIM unit and navigate to the “Primary Mirror Covers” tab.

Open the Mirror Covers:

If the mirror covers aren't opening correctly or the current stays high (over 1000milliamps) then there is a problem. Abort the opening (or closing) and follow this procedure
Verify Mic and PubSub time
Launch VNC Viewer. It will appear on the middle right of the desktop (or just search it in the start menu). You will now want to remotely connect to the Mic and Pubsub computers that run the controller. This is what VNC Viewer does so just double click on the MIC and SUBSUB links in VNC Viewer and it will open a window of each.
NOTE: At this time Pubsub is dumb and will display a “Logout” screen. Click that button and it will display an empty desktop. To find the actual desktop you will need to use the file manager in the Programs menu (top left of the screen)
Make it so you can view the top right of both screens next to each other and confirm that the two computers times are within about 5 seconds of each other. If they are not you must perform the following task: Sync Controller Times.
Launch Pubsub software
Initially the desktop will be blank (black). Start PubSub processes by pressing the tool utility icon at the top of desktop. It is circled in the image below:

This will clear the database and give everything a clean start. Eventually (a few minutes) the “JADE” agent will load and the desktop will look like the below:

The small icons to the right of processes can be pressed to expand them and reveal the list as shown. Once the “Instruments-xx01_0m8a_doma” process is loaded under its section PubSub is ready to communicate with the telescope (and the user). The “RPC_Gateway” process will not show up until communication to PubSub through the web browser commences. This is in the next step. It is OK to close the VNC window.
From Pubsubs Desktop folder double click on the “Clear and Restart Pubsub” program. This will open both a Terminal window and a GUI. The gui will slowly populate with a list of items. Do not process until all those below show up
- Main-Container
- Observatory_doma_tus
- Site_tus
- jTCS_0m8a_doma_tus
- Instruments-xx01_0m8a_doma
- (RPC_Gateway) ←– only shows once connected (via this step) to the controller, will not show initially
Access the LCOGT (PubSub) GUI
Now that the system is up and running with drives, servos, and PubSub- access the LCOGT GUI:
- Open the Chrome Browser and click the quick link labeled PubSub (leftmost icon). You will be presented with the screen below:

- The log on name is unimportant. However default is required for the Config File field.
- Press the “OK” button to continue.
- Wait for PubSub to send all of the data to the browser. It will take 2-4 minutes. If you simply have a blank/white screen → going back to PubSub through VNC may be necessary to make certain it is setup correctly.
- Once the GUI comes up you will be presented with the Site heads up information. Note the small tab is labeled “tus.” This stands for “Tucson.” None of the capabilities on this screen are currently in use.
- Click on the tab beneath “tus” to expose the information under the “doma” tab. The LCOGT software can be used to control multiple telescopes at a site. Our single site has a single telescope in the “A” dome which is roughly “doma.” Again this functionality is not being used.
- Finally click on the “0m8a” tab to expose the controls for the Schulman Telescope. This tab roughly translates to 0.8m a (or first 0.8m telescope).
- Take note of the color of the fields in the column on the left in the above image. They should all be green when the telescope is ready to be used. The “astrometric kernal” can be “yellow” when the drives are not tracking. If the telescope is tracking, this will also be green. If you come to this tab/screen quickly after rebooting PubSub, you may see fields such as “Mount State” indicate “initializing.” This is OK provided that the agent does eventually initialize the drives and the field goes to green after a minute or two.


Homing the Schulman Telescope
The telescope must be homed before it can be operated.
- Go to the Axes tab. Note that the axes are Unhomed.
- Press the large HOME button (circled below) to move both axes simultaneously to the home position. See Telescope Orientation for the correct position.
- Once homed successfully the state field will briefly go to “stopped” and then finally “L1 Positive Limit” in both axes:
- Now go to the Source tab and move the telescope out of the limits to a valid sky position. If the telescope is not going to be used immediately typically the telescope is sent to the park position. Remember to stop the tracking loop if observing is not going to start. The zenith position is inputted in the picture below.

- Please see the Using the LCOGT GUI and Moving the Telescope section for more information.


