phd2:phd2_guiding_abbreviated
PHD2 Guiding
C. Johnson
3/16/2018
updated Oct 3, 2018 by P Gabor & C Johnson
All of the required software is currently installed on the vattcontrol server; login as vattobs.
 (*) When using VATT4k and GUFI, these motors move the two filter wheels for the science camera, the guider camera's filter wheel, the guider camera's 3-axis translation stage, and the stage carrying the center mirror and the U mirror.
- Start indiserver:
- click the indiserver icon on the desktop
- (a terminal window should appear)
- Start phd2 guiding:
- click the PHD2 icon on the desktop
- (the PHD2 application should appear)
- Configure phd2:
- in the
Main tool bar, click icon that looks like a usb male connector- (
connect equipmentwindow should appear)
- in
connect equipmentwindow verify the following settings:- equipment profile “vatt imagers” or “vatt spec” depending on your instrument (the imagers are 4k CCD and GUFI),
- in
connect equipmentwindow, in the camera row, click on the icon that looks like a screwdriver and wrench in an “X”- (
INDI Configurationwindow should appear)
- in
INDI Configurationwindow click theINDIbutton near the bottom of the window- (
INDI optionswindow should appear)
- select the
Apogee CCDtab - verify the following settings:
- in the network section:
- offset guider (used with imagers) ip:port : 10.0.3.14:2571; slit plate guider (used with VATTspec): 10.0.3.12:2571
- click the
connectbutton in theConnectionfield- (after a few seconds, a bunch of new fields and tabs should appear)
- (The message “[ERROR] Model is not supported by the INDI Apogee driver” may mean that the camera is not powered up.)
- near the bottom of the window, turn on the cooler
- IF YOU ARE GOING TO BE AUTOGUIDING:
- click on the “VATT-GUIDE-INDI” TAB
- click “Connect”
- (a UT clock should appear and begin incrementing.)
- exit the
INDI optionswindow - click OK in the
INDI Configurationwindow - click
Connectin theConnect Equipmentwindow, in the camera section- (the button should now say
Disconnect)
- IF YOU ARE GOING TO BE AUTOGUIDING:
- click
Connectin theConnect Equipmentwindow, in the mount section- (the button should now say
Disconnect)
- click
Closein theConnect Equipmentwindow - (OPTIONAL) Set up automatic frame capture:
- Select the
Globaltab, it is part of 'advanced setup' (the brain symbol) - check
Enable diagnostic image logging, then - in the group
Save Guider ImagescheckUntil this count is reached, and - set the value (100 is the maximum).
- the files are stored on the
vattcontrolserver - The Dark Library is located in the directory
/home/vattobs/.phd2/. - The directory
/home/vattobs/PHD2/PHD2_CameraFrames…is automatically created for the session. - If you need to capture more than 100 images, make a renamed copy of the session directory; new fits files should start populating the original sesson directory.
- Move U-Mirror
- Use the Secondary App to move the Guide Camera stage so that it is on the U-Mirror.
- Start Imaging:
- in the bottom left of the PHD2 window there is a button with 2 arrows forming a circle. Click that button.
- the button should gray out, the stop sign button should turn red, and images should start appearing
- Start Guiding:
- change the exposure time setting and contrast slider to find an appropriate guide star.
- Click on the guide star
- click on the circular icon i the tool bar that looks like a target
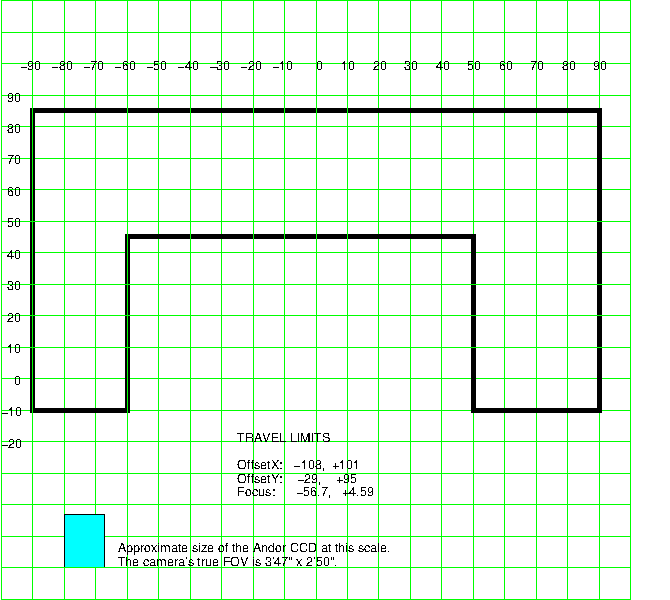
Offset Guider Stage
Note: All numbers are GUI units. The travel limits are accurate but the diagram is only an approximation.

phd2/phd2_guiding_abbreviated.txt · Last modified: 2018/11/08 11:38 by tgolota

