IRAF/ICE for MAESTRO
The science CCD is controlled by the observer using ICE, within
IRAF. Users who have already become familiar with ICE from using other instruments will
only have to skim these pages. You should be familiar with the general use of IRAF and IRAF parameter files.
There is a manual for using ICE at KPNO located at http://www.noao.edu/kpno/manual/ice/ice.html For this document we have copied verbatim some of the relevant text from the NOAO pages.
Note that some of the common ICE commands are not relevant for
MAESTRO.
last update: May 30, 2013
CONTENTS
1. Introduction.
2. Observing Overview: Taking Data
3. The ICE parameters files
1. Introduction.
We assume you are familiar with IRAF; if not, read through the page, Brief Introduction to IRAF and DS9.
ICE stands for "IRAF Control Environment" and was written by Skip Schaller when he was at Steward Observatory.
2. Observing Overview: Taking Data
2.1 Start up: ccdacq
When you type
cl>ccdacq
at an IRAF prompt, you are bringing up the ICE packages. It
is recommended that you open one window and ALWAYS take data from
there, and nothing else. Open other windows to run IRAF to
examine data, edit the log, etc.
2.2 The Only Command You Really Need: observe
With ICE, one takes data with a single command: observe. At an iraf prompt, type
cl> observe
The astronomer will be prompted for the information necessary for controlling the exposure. This includes the following:
Image type: Can be ``object", ``zero", ``dark", ``flat", ``comp", ``focus", or ``ramp".
Exposure time: If the object type is anything other than ``zero" (which
always has a zero-second exposure time), then the user is prompted for
the integration time.
Object title: This is the title put in the image header.
Image Type:
- Note that IRAF refers to a ``bias" as a ``zero"
- You can take darks, but the dark current is negligible and most observers won't need to bother.
- object: this is what you choose when you want to open the shutter and take an image.
- flat, comp, focus: Some spectrographs control the lamps
through ICE, and automatically flip in the comparison mirror, turn off
the guider, turn on the lamps and so forth, using these commands.
For MAESTRO, you control the lamps and comp mirror through the Conductor interface. Ignore these image types.
- ramp: ignore this image type.
If all goes well, the user will be given a one-line ``status" report,
then told that the chip is ``preparing", followed by ``exposing".
If the exposure is long enough, the astronomer is also shown both the
time left to expose and the amount already exposed; these update at
about 5 sec intervals, as do the temperature of the CCD (Tcam) and the
temperature of the dewar (Tdew).
The dewar temperature will begin to increase if the liquid nitrogen is
used up; keep an eye on this number and call for help if it goes up by
two degrees.
In the unlikely event that the CCD or ICE hangs, you will notice that
the time left to expose no longer is being updated. Call for
help.
Finally, the user will be informed when the chip is reading out.
Read-out time for MAESTRO depends on the binning and how much of the
CCD you are keeping. Reading out the entire 4096x4096
CCD in 1x1 binning takes about 2 minutes.
Finally the user is told that the image has been written to disk.
The image should appear in the directory you are in when you typed
"observe".
2.3 Doing More with mores
Did you like that last exposure and want to do some more just like it? There is a command to help you out: mores. To do two more exposures with the same parameters (image type, exposure length, title) of the previous observe command, do a
cl>mores 2
and you will be told what images are being written to disk.
2.4 Changing Things On the Fly
ICE allows you to pause (``p"), resume (``r"), stop (``S") and abort
(``A") an exposure in the midst of an integration. Furthermore, you can
change the integration time (``x"), or the title (``t") during an
exposure. Since each command is a single key-stroke command (no
carriage return is needed), accidentally typing in the data acquisition
window during an exposure could have serious consequences. (For
instance, typing a flpr with the mouse positioned in the acquisition
window would pause (``p") and then resume (``r") an exposure!) Thus we
require an exposure to be paused before doing anything else, and the
commands that terminate an exposure, stop and abort, require capital
letters (``S" and ``A").
2.4a A Momentary Flutter: How to Pause and Resume an Exposure
Consider the unlikely situation that clouds have drifted
overhead during an exposure. You may wish to close the instrument
shutter until that single cloud moves by. To pause the integration
simply type p in the acquisition window. (The exposure must be long
enough that you are seeing the updating ``Time left" message, i.e.,
>5 secs.) You will see a ``PAUSED" message printed next to the dewar
temperature.
To resume the exposure, simply type an r. The shutter will open and the time will begin updating again.
Although the shutter is closed during a "pause" the CCD will continue
to collect cosmic rays, and if the telescope tracking is on, the
spectrograph will continue to flex. Read out your exposure and
save it to disk (p, then capital S) if you've been paused too long
waiting for the clouds to clear.
2.4b Terminating an Exposure Early: Stop and Abort
You may decide to stop an exposure early, read out and save what you have to disk. First you must pause
the exposure using p; you can then type a S to stop. (Note that the
``S" must be upper-case.)
Or you could decide you don't want the current exposure at all. In
order to abort the exposure, first pause the exposure with a p and then
abort the exposure with an A. The image will be lost, and the exposure
counter will not be updated. (Note that the ``A" must be upper-case.)
2.4c Changing the Exposure Time
It is also possible to change the exposure time in ICE. You must
first pause the exposure using a p. Once paused, you may change the
exposure time by striking the x key. You will be queried for the new
exposure time. Don't forget to follow this with an r to resume the
exposure.
Note that while you can always shorten the length of an exposure, you
can only increase the length of an exposure if the initial exposure
length was longer than 5 mins (by default). The user should be warned
that an exposure time that has been changed to 30 secs, say, will not
be as accurately timed as an exposure that began and ended as 30 secs.
The actual, correct exposure time will be recorded in the header of
each image.
2.4d Changing the Title
Once you are paused, you can even change the title of the
exposure. (Of course, you are losing valuable observing time while you
are exercising this feature!) First type p to pause, and then type t.
You will be asked for the new title. Don't forget to resume the
exposure with an r. Of course you can always change the title after the exposure is over, using hedit.
2.5. The Amazing Power of flpr
If you've gotten an error message, or got out of
some parameter file in a funny way, or typed a CNTL-c or done anything
at all out of the ordinary, you may well find that things are just a
little bit funny. The safest thing to do is to type flpr. (This will
``flush the process cache.")
cl> flpr
It doesn't hurt to type this twice, and sometimes it helps. If flpr
itself produces some strange message that doesn't clear itself with
another flpr, you may need to log out of ICE/IRAF completely and start over.
2.6 How to Get Help
IRAF comes with on-line documentation that gives the nitty-gritty of
each command. Simply type
cl> help mores
to see the help page for the "mores"
command. You can get a hard-copy of this help page by directing the
output to the laser writer in the control room.
cl> help mores | lprint
2.7 Other Useful Observing Words
Although observe is the only data-collection word you need to learn, there are a few others that you may find useful.
2.7a Doing a Sequence of Observations
We saw above that we can use htmlref moressec:mores n to do n more
observations just like the last one. But what if you know exactly what
you want to do in the first place and would just like to start a series
of 20 bias frames running? There are specialized tasks that will do a
series of observations of each image type, namely:
zeros
objects
flats
comps
darks
ramps
Each of these commands will query for the number of exposures, exposure time, and title. Note that mores will repeat more exposures of sequences begun using any of the above commands.
Also note that if you change the exposure time during a series of
integrations, this change will propagate to subsequent exposures of the
series; this is not true of changing the title, at present, however.
Stopping or Aborting an exposure will terminate the series.
In practice zeros and objects are the only commands you probably need for MAESTRO.
2.7b. Running a Test Exposure Using test
In addition, it is possible to do a test exposure that will always overwrite an image named test.fits by typing test.
cl> test
This is really useful if you want to read out an image but not keep it, e.g. use test to clear the
charge out of the CCD after it's been blasted by lights in the dome.
2.7c. Checking the CCD: ccdinfo
Typing
cl>ccdinfo
queries the CCD and returns the current dewar temperature, and other
housekeeping numbers. It is a good way to make sure that all the
computers are talking to each other, and things are OK. Taking a bias frame is another way to check.
3. The ICE Parameters Files
ICE has made it easy for you to observe by providing a single
word for data-collection: observe. However, this ease has not come at
the cost of flexibility; instead, all the options have been buried in
the parameter files. There are four of these parameter files which must
be properly set, but which you will likely leave alone throughout the
course of your run:
detpars
This parameter file controls the fundamentals of how the CCD detector
is read. All items in this parameter file are crucial for correct
operation of the CCD.
instrpars
This is the instrument parameter file, and at most telescopes is
currently used by ICE only to add information to the picture headers.
obspars
This is the parameter file that is used by the astronomer to tailor the observe command to his/her liking.
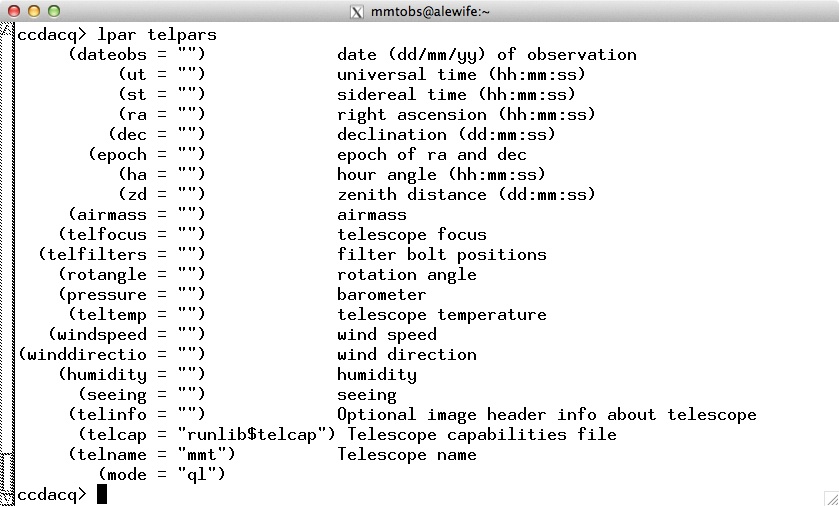
telpars
This parameter file is used only to specify the protocol needed to
communicate with the telescope computer in order to allow proper
transfer of header information (time, telescope position and
particulars) to ICE.
These parameter files can each be listed using the lpar command, e.g.,
cl> lpar detpars
and may be edited using the parameter editor epar, e.g.,
cl> epar detpars
In fact, you can enter the parameter editor for detpars by simply typing detpars
cl> detpars
To change a value in the parameter editor move the cursor up and down
with the arrow keys until you are on the correct line, and then simply
type the new value, followed by [CR]. When done editing a parameter
file, type CNTL-z (or CNTL-d, depending upon what you chose for an eof
character when you ran obsinit.
3.1 detpars
The detector parameter file detpars allows the astronomer to specify
how the chip is to be formatted and the chip identification so that the
correct microcode is loaded.
Typing
cl> lpar detpars
will give you something like
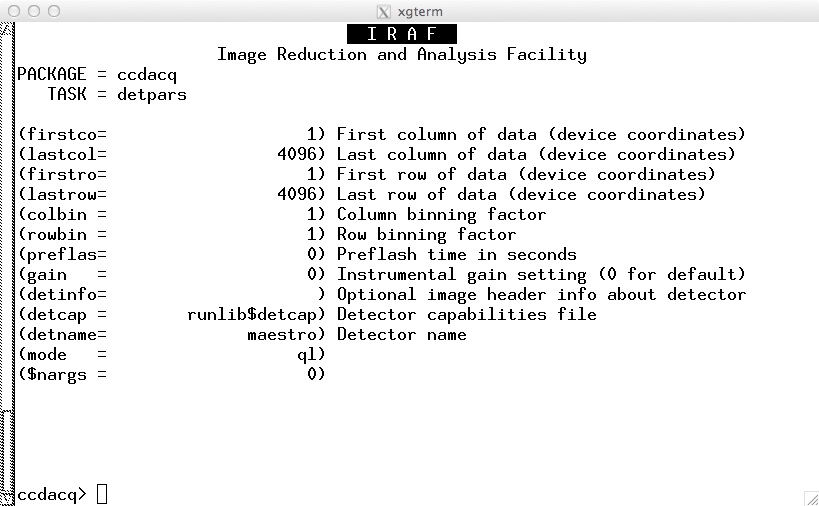
firstcol, lastcol, firstrow, lastrow, colbin, rowbin: These parameters
describe the ``active" area of the chip that you wish to use, and
whether adjacent pixels should be binned or not. In the case that you
do choose to bin the data, the first and last columns and rows refer to
that of the unbinned pixels.
firstco and lastcol should probably always be 1 and 4096, respectively,
since these are the pixel numbers in the dispersion direction.
firstro and lastrow can be adjusted to read out part of the CCD,
since part of the CCD is not illuminated by any light. Lately
we've been setting firstro=1, lastrow=2048. These may change
slightly if the dewar is taken off and remounted.
colbin and rowbin: these can be changed to carry out on-chip binning.
preflas, gain, detinfo: these parameters are hardwired for MAESTRO, ignore them.
detcap: this is a file in directory runlib$ which contains information about Lesser CCDs at Steward.
detname: This should be "maestro" so the code reads the correct
parameters from detcap. If the CCD images are looking funny,
check that detname =maestro and not some other CCD.
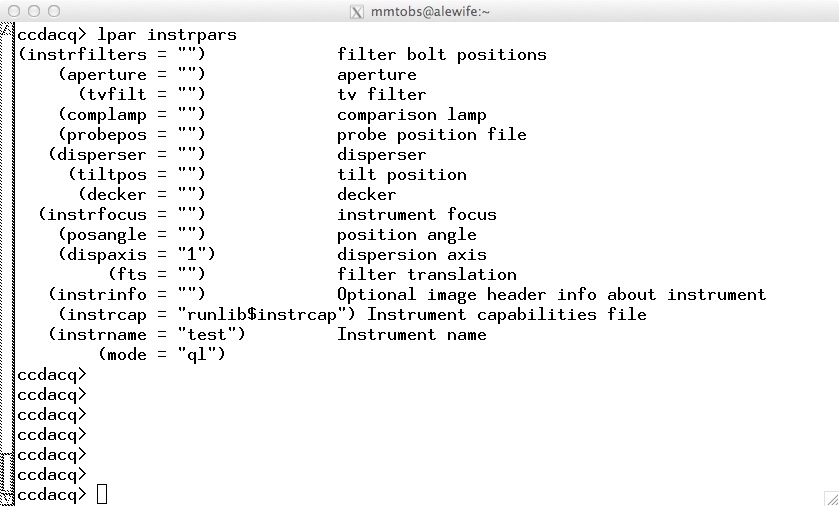
3.2 instrpars
This parameter file can be edited to allow the observer to enter
information which is automatically written into keywords in the
fitsfile header. However, most of the parameters are not relevant for MAESTRO and are unused.

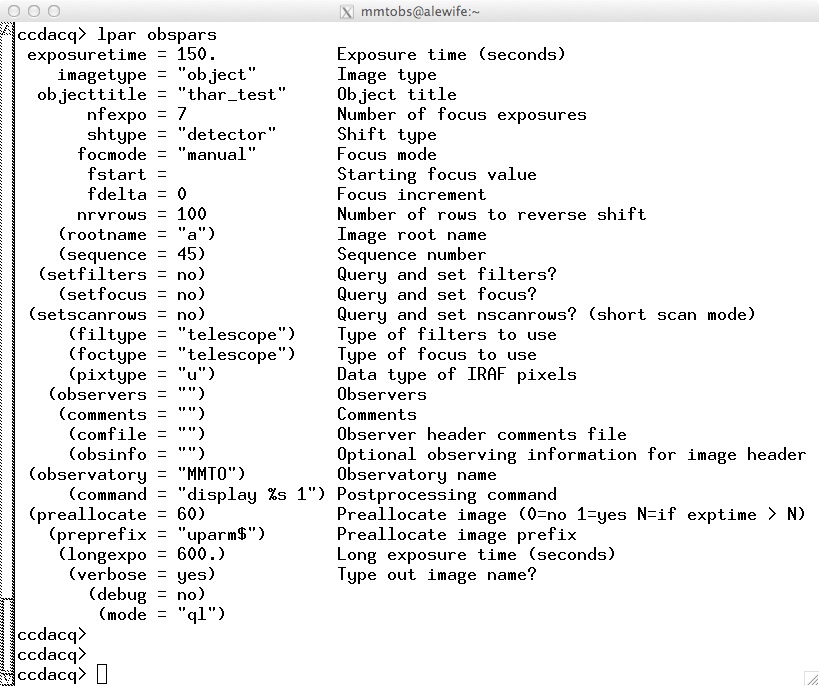
3.3 obspars
The parameter file obspars allows the astronomer to specify
details of how the images will be named, the name of the observers, and
various additional comments for the header.
Parameters that you may wish to alter:
rootname and sequence: These control what the next picture will be called, e.g., n30001
You may wish to change the rootname from night-to-night, but remember
to keep this short---you will have to type this every time you refer to
the image.
The sequence number allows you to reset the picture counter to
whatever
number you want, although you must first explicitly get rid of any
images with the same name using imdelete, delete or rm. You
may have to edit the sequence number if an exposure aborted
ungracefully.
setfilters and setfocus: These two parameters control whether the user
will be prompted for the correct setting of the filter and/or focus
value at the beginning of each exposure. These are not relevant for MAESTRO
setscanrows, nscanrows: This parameter controlls the ``short-scan"
option with the scan-table at the 4m P/F. Not relevant for MAESTRO.
observers: Put your name here
comments and comfile: These two parameters allow you to add even more
information to your header. The parameter comments may be edited to
contain a single line of additional comment. The parameter comfile may
contain a file name that contains multiple lines of comments. Each line
of this file is automatically formatted into a FITS COMMENT record. You
should not include the COMMENT keyword in this file. Since this file is
read at the beginning of the read-out, you may edit this file any time
during the exposure.
command: This is a very powerful (and potentially dangerous)
feature: any IRAF task placed here will be executed immediately after
the chip is read-out. The default is to execute the script postproc.cl
in background mode. This file will causes the terminal to ``bleep" at
the end of the integration, and will automatically display the new
image in the ds9 window.
Typically, you can enter "display %s 1" for the command parameter
preallocate, preprefix, longexposuretime: more vestigial parameters, not used with MAESTRO
3.4 telpars
The data taking computer you sit at (e.g. pixel or alewife) that
can communicate with the telescope mount computer to pass along header
information giving the time, telescope position, and telescope
particulars at the beginning of the integration. However, for
this to work, ICE must know the name of the telescope you are using.
This should have been automatically set for you at the beginning of
your run. Setting the telescope name to ``test" allows you to
take data when the telescope computer is down or otherwise
incommunicado; of course, you won't get any telescope header
information in this case.